The ultimate guide to the DJI app


Use our ultimate guide to the DJI app and we'll explain all menu items and functions in detail.
DJI Go app for DJI Mavic Pro, DHJ Phantom and DJI Inspire series
This guide explains all the features of the powerful DJI Go app — perfect for owners of the DJI Mavic Pro, DJI Mavic Pro 2, DJI Phantom 4 Pro or the DJI Inspire and DJI Inspire 2. You'll find answers to questions such as:
- How do I change the sensitivity of the joysticks?
- How do I solve problems when there are delays in the live feed?
- What are the benefits of configuration settings 1, 2 and 3?
- What is the IMU and why is it an important setting?
- How does the “EV” setting help with setting the exposure?
- What is the function of the “Video Caption” setting?
- Why should I enable Enable Hardware Decoding?
- What are the benefits of the C1 and C2 buttons?
- How does “Cache Map Data” help if I don't have a mobile signal?
Discover the possibilities & become a better drone pilot
With the DJI Go app, you connect your smartphone to a remote control for the DJI Mavic, DJI Phantom or DJI Inspire series and benefit from extensive additional functions for your drone flights.
When connected to the app, the screen displays the image from the drone camera. Now you can adjust camera settings, view captured footage, activate intelligent flight modes, and more.
The following tutorial was created with the DJI Phantom 4, there may be slight differences with the other drones or a more recent app version, but the main functions and operating concepts are the same.
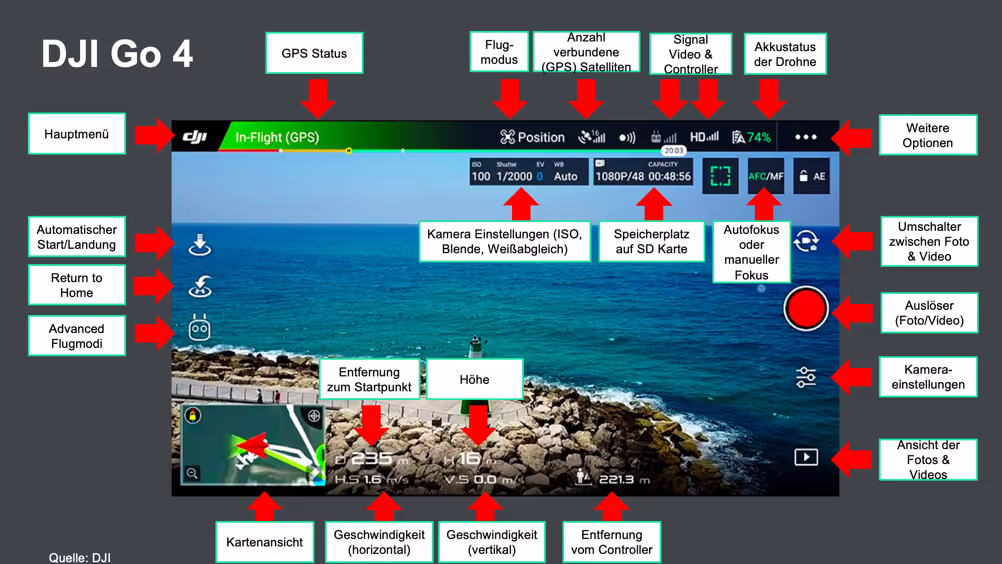
1. The status of the drone

For the status overview, click at the top of the screen Ready to go The status”Normal“means that the drone is ready for use, otherwise you will see a problem in red
1.1. Calibrate the compass
Die compass function is very important for the orientation of the drone. If you let your drone fly in a new location, you should be on the safe side Always recalibrate the compass!! The reason: The integrated compass is sensitive to electromagnetic interference and deviations from the last calibration impair flight behavior.
Click on”Calibrate“and follow the on-screen instructions. Calibration notes:
- Do not calibrate near railroad tracks, metal objects, and other objects with strong magnetic interference.
- Always calibrate the compass outside.
1.2. The remote controller mode
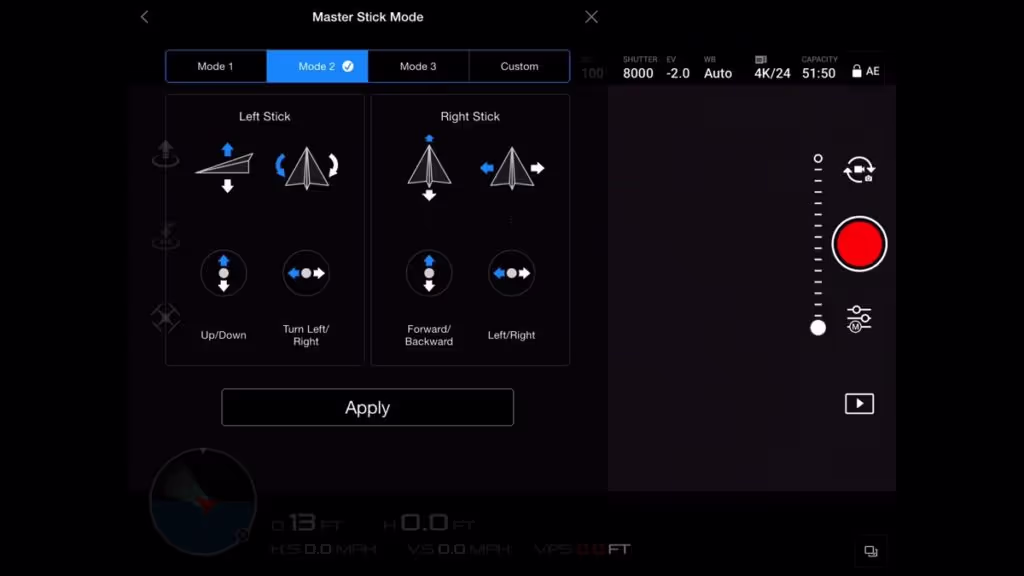
In mode 2, the left joystick controls rising and falling as well as turning left and right. The right joystick is used to fly forwards and backwards as well as to fly left and right.
Most drone pilots prefer mode 2. If necessary, check out modes 1 and 3 or configure the joystick function according to your own ideas. In some cases, left-handers are better off with an alternative configuration.
2. Main controller settings
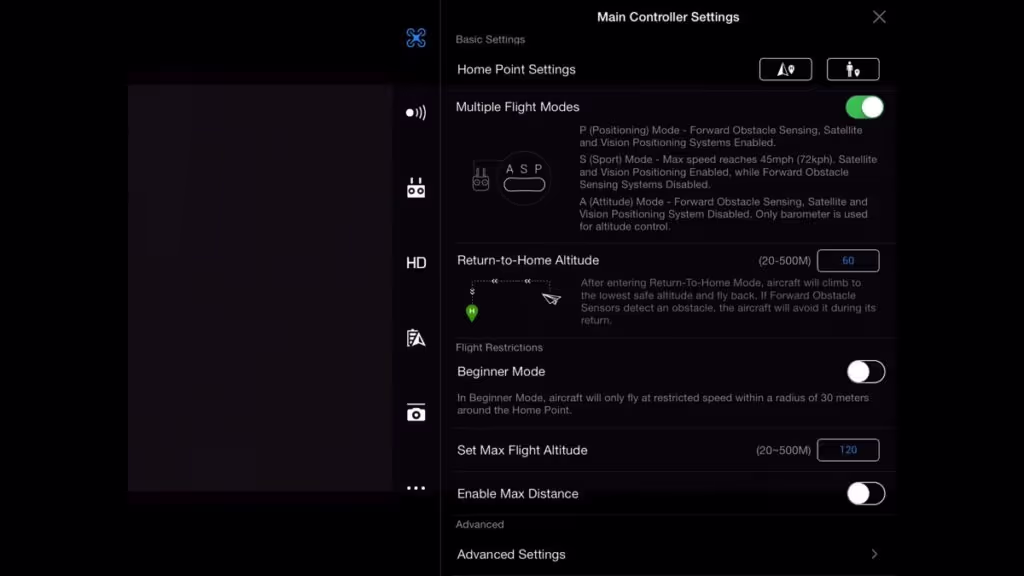
Here you set the home point, activate several flight modes, switch on the beginner mode and set limits for the maximum altitude and distance.
2.1. Home Point = Set the return location
You can set the home point in two ways:
- The arrow button sets the drone's current location as home point.
- The button with the male saves the home point in place of the controller. This brings the drone straight back to you. This function is particularly useful when your location changes and you are traveling in a car, for example.
2.2. Multiple flight modes = the flight modes
- Positioning Mode (P-Mode): All drone sensors are activated, the drone flies stably. It is the safest mode. When you're not steering, the drone automatically brakes and hovers in position.
- Attitude or ATTI mode (A-MODE): The sensors are deactivated, the drone drifts in the wind and only maintains its height. To slow down, you must actively counteract this. Many experienced pilots prefer to shoot video in this mode, which allows smoother movements and maneuvers.
- Sport mode (S mode): In sport mode, you can move your drone at top speed while still being able to connect to GPS satellites. In this mode, collision avoidance technology is disabled!
2.3. Return to Home Altitude
This setting determines the flight behavior in terms of altitude when the connection to the controller is lost. In any case, the height should be set higher than objects in the area. For safety reasons, a height of 50 meters is recommended to avoid collisions with trees and buildings.
2.4. Beginner Mode
This mode helps beginners with their first flight lessons. Many advanced features are disabled.
2.5. Max Flight Altitude
Here you set the maximum height. In Germany, in most cases, 100m is the maximum altitude (without a special permit). In exceptional cases, however, the height may also be lower, e.g. 50m.
2.6. Enable Max Distance
With this setting, you define the maximum distance between the drone and the controller; legally, the drone must always remain within sight.
2.7. Advanced Settings

With these options, you can make fine adjustments so that your drone flies through the air as smoothly as possible.
2.7.1. Gain & Expo Tuning
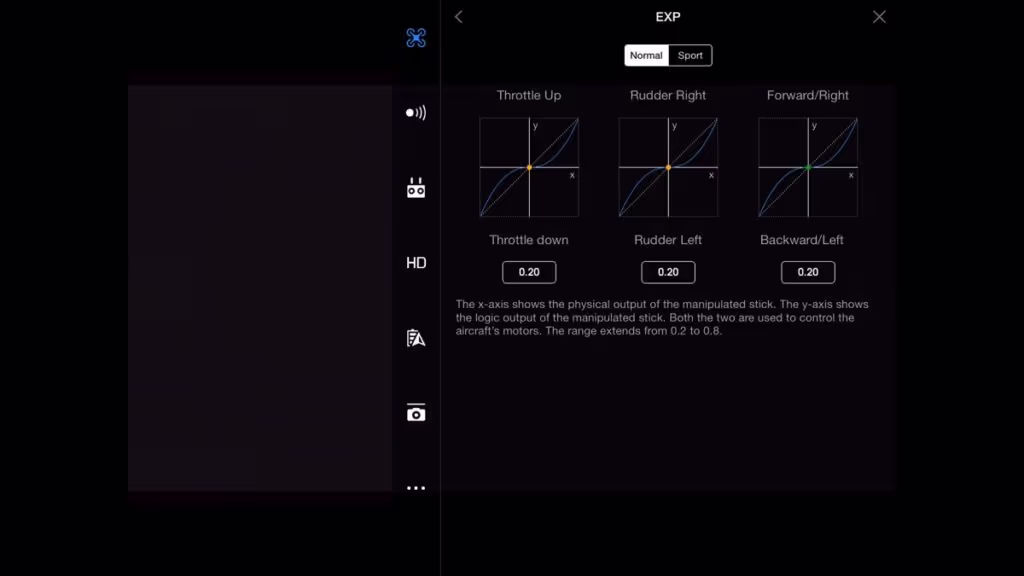
Determine how quickly control movements are converted into movements. A slower value means that you have to move the joystick more before the drone reacts.
EXP stands for Exponential Curve; the EXP values represent the relationship between joystick movements carried out and feedback from the drone. The X-axis defines how hard the stick must be pressed, and the Y-axis defines the amount by which the drone reacts.
Sensitivity
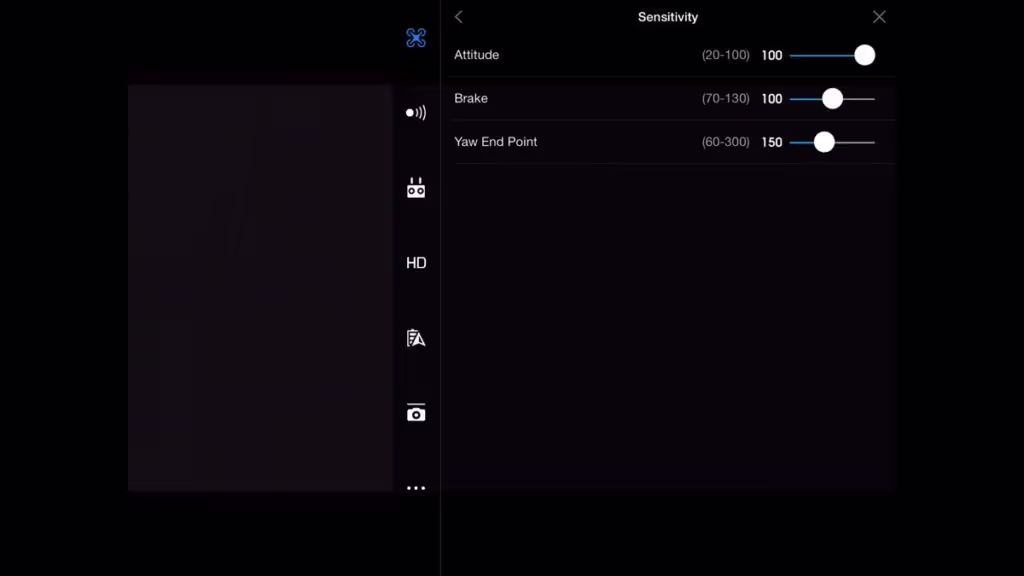
Sensitivity defines sensitivity.
- Attitude: How quickly should the drone react.
- Brake: How fast should the drone stop in GPS mode. A lower value means smoother braking.
- Yaw Point End: The yaw point end indicates the rate of yaw. A higher value means that the drone is yawing faster.
Gain
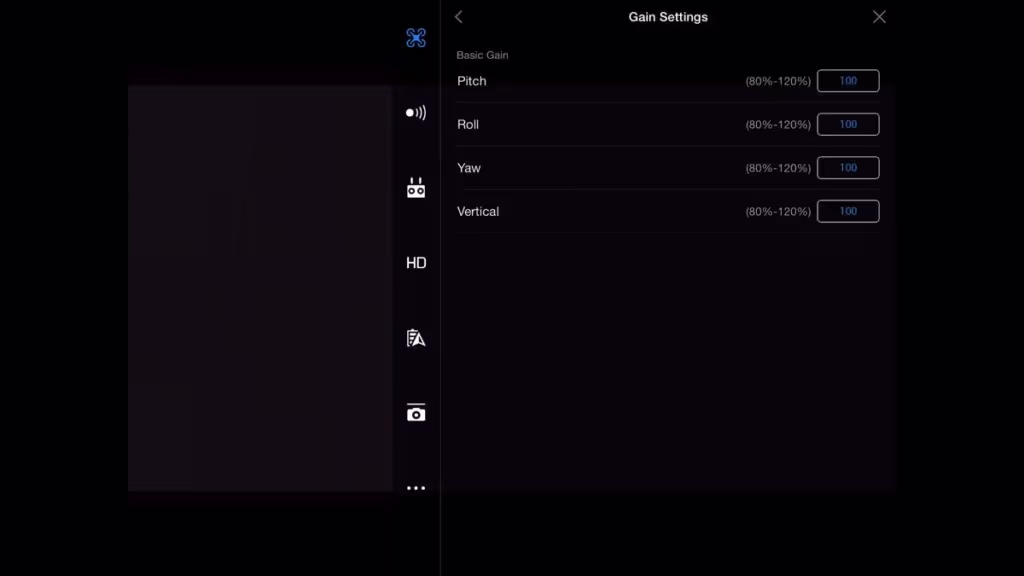
Gain indicates how the drone reacts to external influences such as wind. Changes influence flight dynamics; only experienced pilots should make changes here. Incorrect settings can result in unstable flight behavior.
2.7.2. Sensors: IMU (Inertial Measurement Unit)
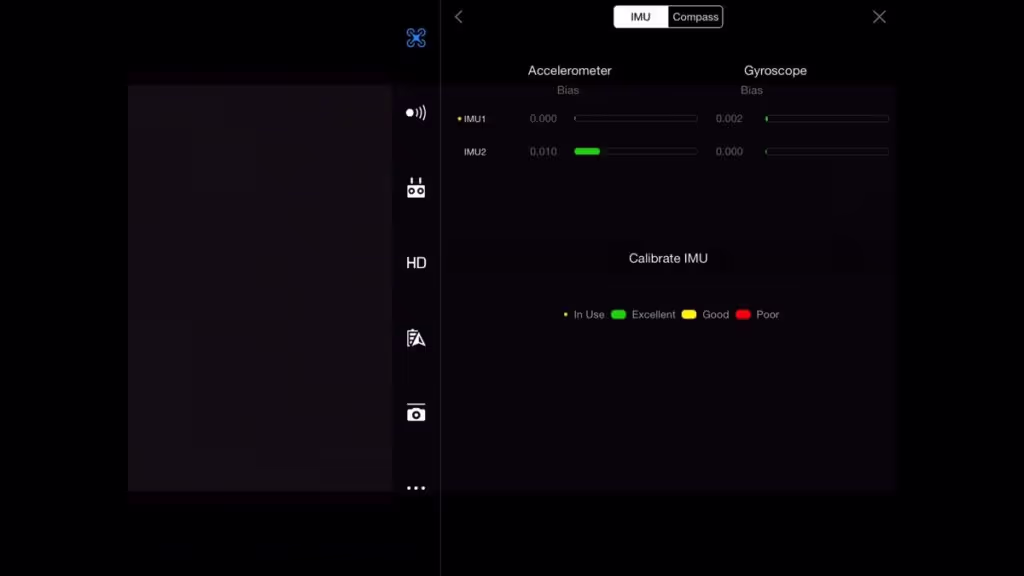
To ensure that the drone can automatically maintain its current position, the equipment includes a 3-axis acceleration sensor, 3-axis angular velocity sensors and a baromatic altimeter.
Important: Perform IMU calibration when the drone drifts, shows a compass error, or flies strangely!
To calibrate, make sure that the drone is on a flat surface and is not moving.
Sensors > Compass: Here, the compass is checked for problems, and calibration is also possible.
2.7.3 RC Signal Lost
If the connection to the controller is lost, the drone can:
- return to the return-to-home point
- float on the spot or
- automatically land at the current position.
A signal interruption can have various causes, for example when the signal is blocked, the controller battery is empty, or the distance to the drone is too long. Therefore, always set a meaningful home point.
2.7.4. Smart Return to Home
The function lets you know when the battery is running low and your drone should return. You can see the status on the main screen, which is shown in green, yellow and red. The farther the distance to Home Point, the further the display moves to the left into the yellow and red zones.
Remember: If you fly against the wind, more energy is needed to get back!
2.7.5. Switch on front LEDs
Here you turn on the red front LEDs, which can be useful when flying in low light.
3. The Visual Navigation Settings
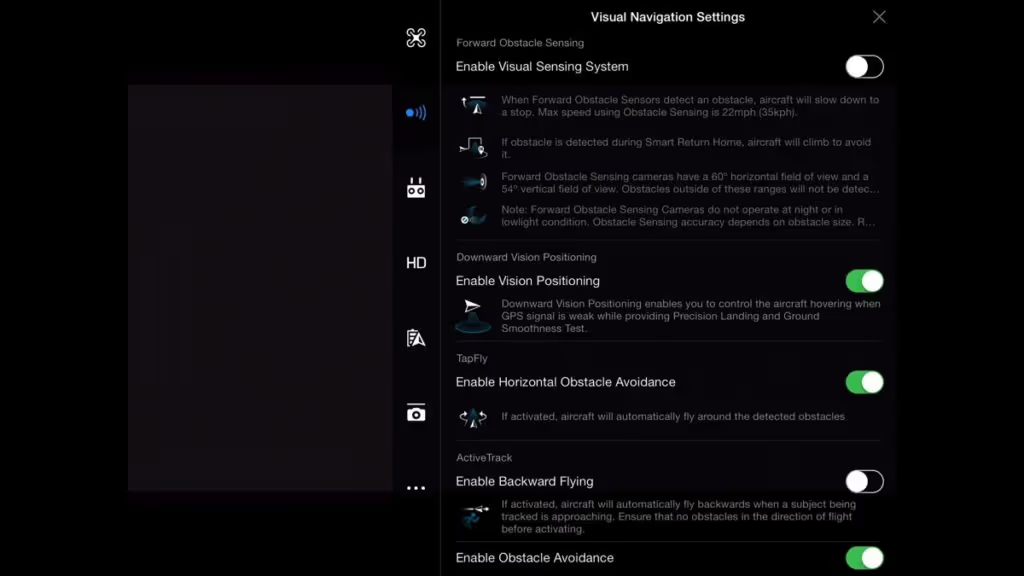
The settings in this menu help you keep your drone in the sky. You decide which sensors are switched on. For safety reasons, all sensors should be switched on.
3.1. Enable Visual Sensing System
Here you switch the sensors on and off to avoid collisions. At a speed of more than 35 km/h, these sensors automatically switch off!
3.2. Enable Visual Postioning
When flying in buildings and with a weak GPS signal, this function helps the drone to fly stably.
3.3. Enable Backward Flying
In “Active track intelligent mode”, the drone can automatically fly backwards when required when this function is activated. This happens when the object reverses its direction. To be on the safe side, the function should only be activated when collisions are ruled out.
Note: The DJI Phantom 4 Pro and the DJI Mavic Pro 2 also have sensors on the back to recognize objects and can therefore fly backwards more safely.
3.4. Advanced Vision Sensors
Informs about the status of the navigation sensors, all should display “normal.”
4. Remote controller settings
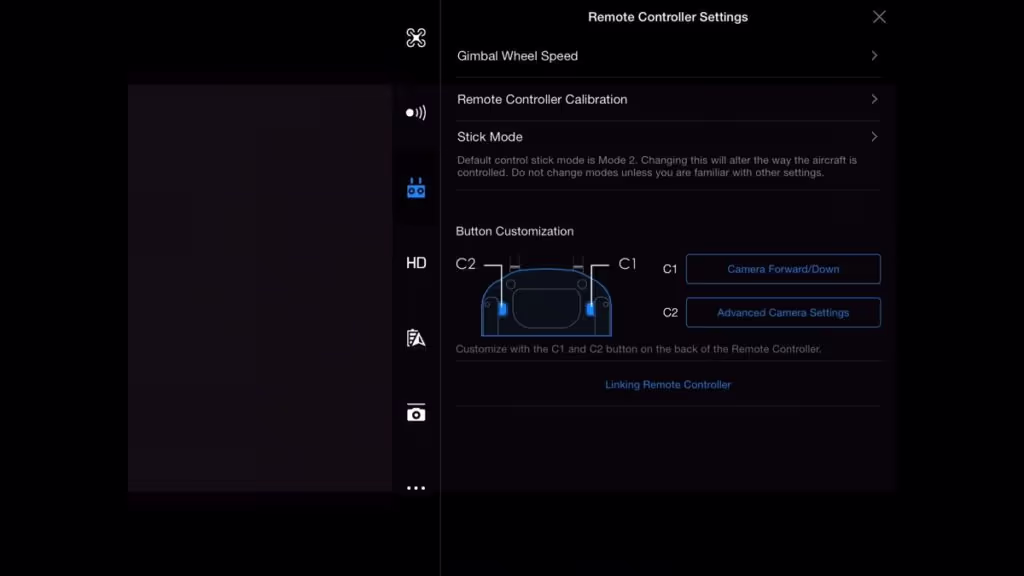
In this menu, you adjust the settings for the remote control.
4.1. Gimbal Wheel Speed
Here you adjust the sensitivity of the physical gimbal control wheel at the top left of the remote control.
4.2. Remote Controller Calibration
If you have problems with the remote control, you can calibrate it here. The drone must be switched off for this.
4.3. Stick Mode
By choosing Mode 1, 2, 3, or Custom Mode, you choose how the joysticks control the drone. Mode 2 is the standard.
4.4 Button Customization
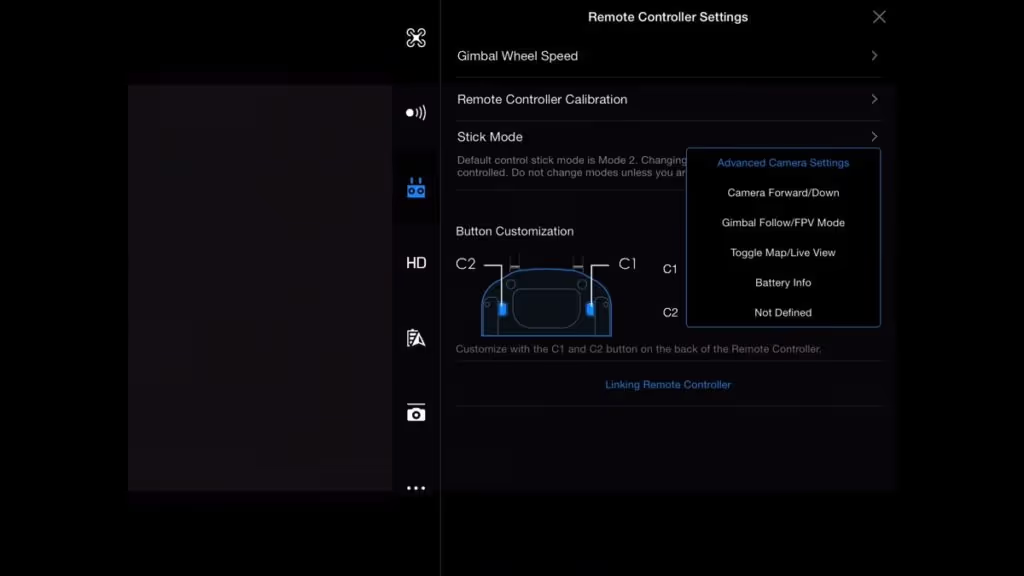
In this menu, you can select a command for the C1 and C2 buttons according to your needs. Practical, for example, is:
- C1 = Camera Forward Down
- C2 = Advanced video settings
4.5. Linking Remote Controller
This is where the connection between the remote control and the drone takes place. This may be necessary if you're using a new remote or if you're disconnected.
5. Image transmission settings

In this menu, you make settings for the live broadcast.
In most cases, “Auto Mode” can be retained, but you can change the settings if the signal transmission isn't working properly.
- Select Channel: Select another channel if the broadcast isn't stable.
- Transmission quality: the higher the quality, the lower the range.
6th Aircraft Battery
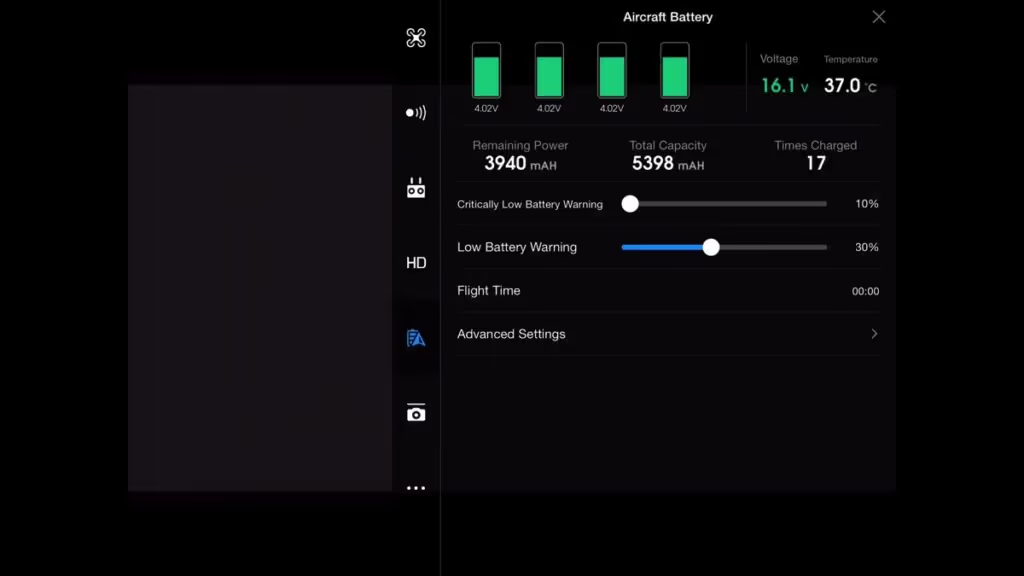
Here you can find detailed information about the battery status. The menu tells you the energy per charge, temperature and remaining power in mAh. You can find out how often the battery has already been charged and see the flight time so far.
Critically low battery warning: When do you want to be notified of a critical battery level? 10% is a recommended setting.
Low battery warning: When would you like to be notified of a low battery level? 30% is a recommended setting.
6.1. Advanced Settings > Time to Discharge
When the smart batteries are not being used, you can set the time for automatic discharge here. This should have a positive effect on the durability of the batteries. A useful setting can be 3 days
7. Gimbal settings
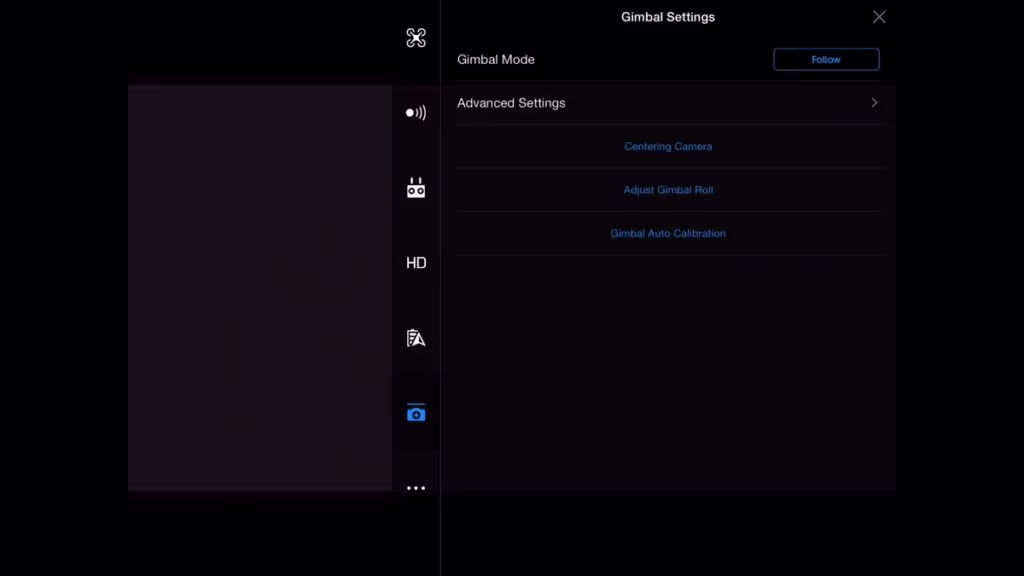
In this menu, you set the camera's gimbal function.
7.1. Gimbal Mode
There are two settings options for gimbal mode:
- Follow: In follow mode, the camera remains stable and maintains the horizon.
- FPV (First Person View): This feature is handy if you want to orient yourself with the drone's movement. When the drone tilts sideways, the camera also tilts, and changes in drone orientation are followed by a change in camera view. In this mode, you feel like you're flying. When the camera is centered (”Centering Camera“), the camera moves straight down or horizontally into the middle position.
7.2. Advanced settings
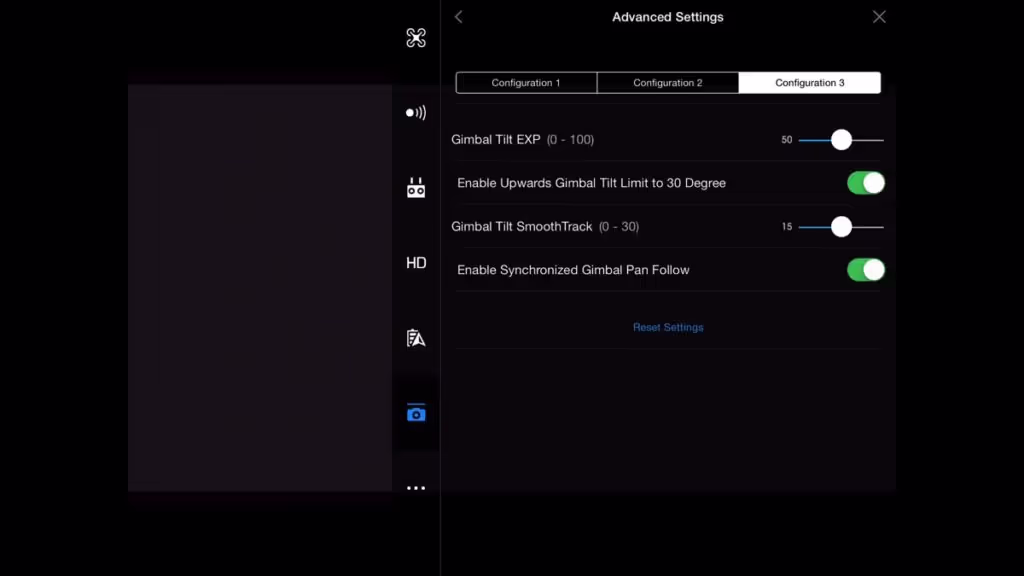
There are three configurations to choose from for the gimbal function in this menu. Try out the settings extensively so that you get a feel for what the features mean. For many pilots, the three settings are suitable for fast, normal and slow movements.
- Configuration 1: Default speed
- Configuration 2: Quick movements for photos so that the camera can be moved quickly.
- Configuration 3: Gimbal is slow, ideal for “soft video recordings.”
7.3. Enable Upwards Gimbal Tilt Limit
If the function is activated, the camera angle can change beyond the 30° limit. As a result, the drone propellers become visible.
7.4. Adjust gimbal roll
This is where you adjust the gimbal angle if something doesn't fit. You can use the function to make adjustments in flight without having to land the drone to recalibrate.
7.5. Gimbal Auto Calibration
Use this function if the motor is in continuous use or if you notice any other problems. To do this, the drone cannot be in the air and must stand on a flat surface. Calibration is recommended after a long trip with a drone, for example.
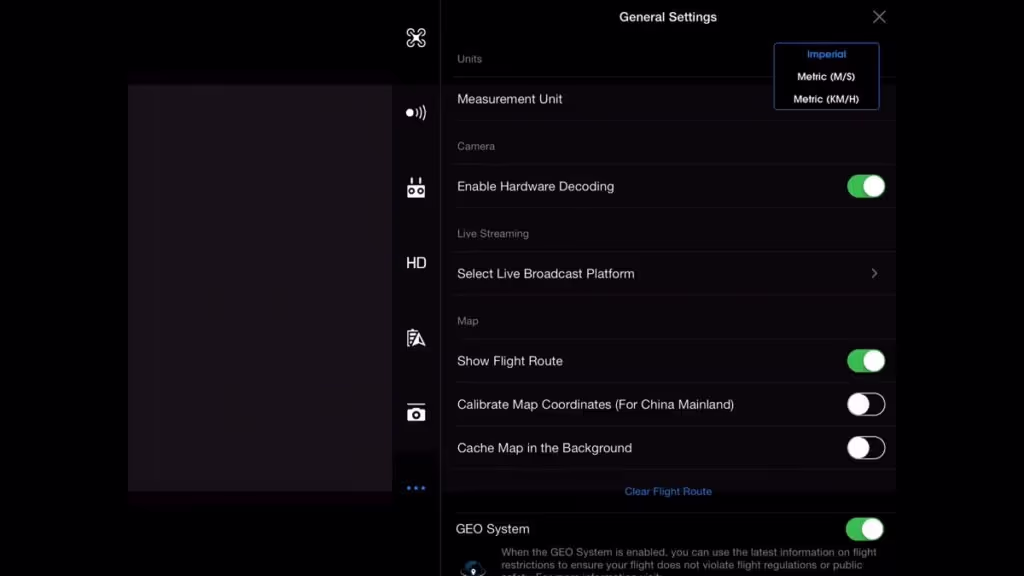
8. General Settings
This is about cache settings, live streaming, and more information.
8.1 Enable Hardware Decoding
Enable this feature if the video ad freezes or if you find any other issues with the broadcast. Hardware decoding helps decode the live video feed.
8.2. Select Live Broadcast Platform
This menu allows you to share your recordings directly via live stream via platforms such as Facebook and YouTube.
8.3. Cache Map in Background
If your smartphone or tablet is not connected to the Internet during the flight, you can use this function to load and save the maps from home via WiFi. The DJI Go app saves the maps and displays them during your flights.
8.4. Geo System
Here you can find useful information about flight regulations and applicable restrictions for the area.
8.5. Video Cache Settings
Settings for caching photos and videos, the app saves the photos and videos in low resolution on the smartphone or tablet for quick reviews.
8.6. Cache during video shooting
If the live feed transmission arrives with a time delay or your device doesn't have much storage space available, you can turn off this function for better results.
8.7. Largest video cache capacity
How much storage space can the app use? One possible setting is 2GB. If you have a lot of free space available, you can set a higher value. Does the check mark remain Clear Cache Automatically Set, the app automatically deletes the memory as soon as the limit is reached.
8.8. Flight Log
Here you can find lots of information about the flights you have taken.
8.9. Other
In this menu item, you give your drone a name and find information about the serial number.
9. The right side of the screen
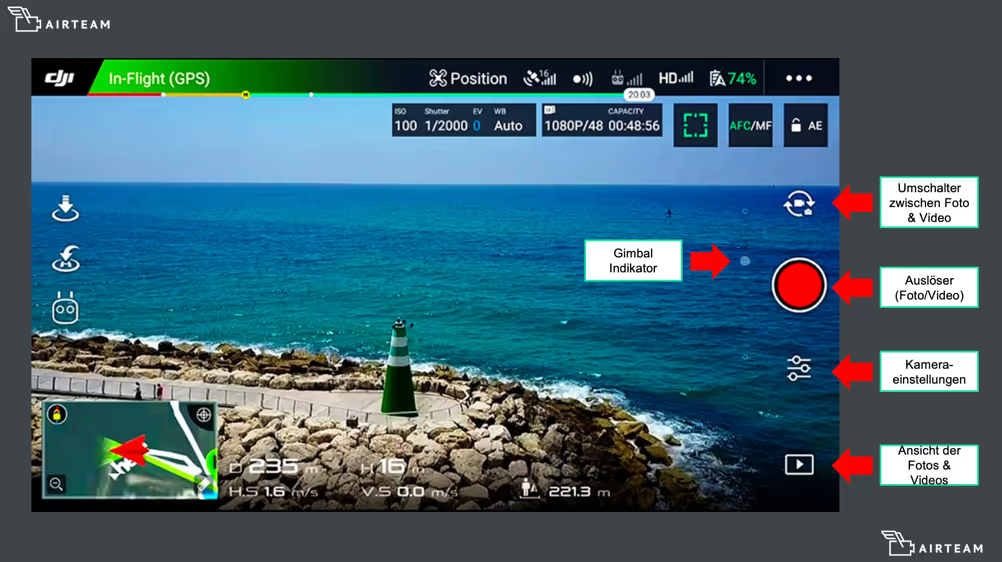
- Gimbal indicator: The gimbal position tells you how much the camera can point further up or down.
- Photo/video change: Switch between photo and video modes.
- Shutter: Take a photo in camera mode, start and stop recording in video mode.
- Play button: Play back recordings
- Camera settings: Adjust camera settings.
- Auto mode: automatic ISO and shutter speed settings
- Manual Mode: for experienced photographers.
- ISO: camera's sensitivity to light.
- Shutter speed: shutter speed, shorter for sports shots, longer in low light.
- Aperture: Aperture indicates how much light is transmitted to the lens. Large opening for portraits with focused foreground and blurred background.
- EV: shows the set deviations from the measured optimum in manual mode and helps with the correct setting.
- Video setting mode for video recordings
- Video Size: Setting the resolution and frame rate.
- Video format: Determines the file format used.
- NTSC/PAL: PAL is the standard for television sets in Europe.
- White Balance: The white balance ensures realistic color reproduction.
- Style: to adjust sharpness, contrast, and color saturation.
- Photo settings
- Single Shot takes one shot per click on the shutter button.
- HDR (High Dynamic Range): the camera takes two or more pictures with different exposures and calculates a more dynamic display.
- Multiple: takes multiple shots in a row, ideal for recording a specific action.
- AEB (Automatic Exposure Bracketing): creates recordings with a wide variation between the bright and dark areas. The camera takes a picture with normal exposure, then underexposes and overexposes. The result is 3 RAW images, which you can combine into one HDR photo with Photoshop.
- Timed Shot: Recording with a set time delay, for example for a selfie.
- Image seats: the recording format, default is 4:3.
- Image Format: In RAW format, no information is lost and the storage space requirement is greatest. In JPEG format, the images are optimally compressed.
10. The left side of the main screen
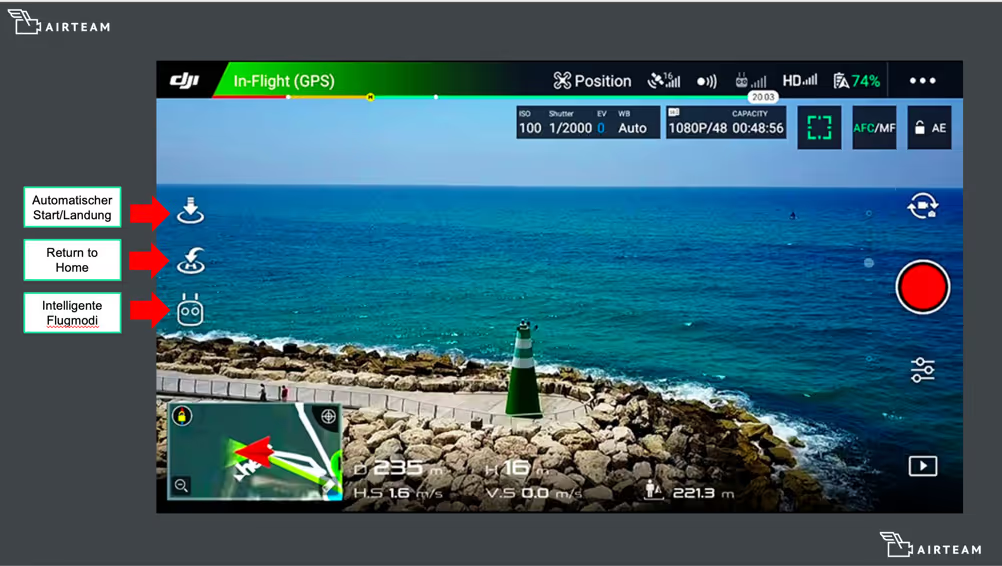
- Auto takeoff/landing: When the button is pressed, the drone automatically launches approximately 1.20 meters into the air and then floats in position.
- Return to Home: The drone automatically returns to the set home position and lands.
- Intelligent flight modes: Here you can choose from various smart joint modes.
- Active Track: The drone automatically recognizes objects such as people, cars or boats and follows them. As a result, all you have to do is control the camera while the drone flies automatically.
- Tap Fly: You simply tap on a point on the screen and the drone automatically flies to the specified destination. Here, too, you only control the camera as a result.
- Point of interest: Select a building, object or location as the POS and the drone flies around it in circles.
- Way Points: Set GPS coordinates that the drone automatically flies off.
- Follow Me Mode: The drone automatically follows you.
- Home Lock: The control system acts fixedly to the home point. When you move the joystick back, the drone automatically flies back to you, regardless of the direction. This feature is particularly handy if you've lost sight of the drone.
- Course lock: The drone flies in a straight line even when the nose is pointing in a different direction. The steering maneuvers react relative to the current flight path. This mode is good for flying a straight line while you control the camera.
11. Map view
When you click on the small map, the map view opens in full screen mode.
- Warning space setting: Here you can display alerts for objects such as nearby airports.
- Center map: Center the map.
- Compass icon: Show the map facing north.
- Map Viewing Modes: to display the map
- Standard with display of street names, etc.
- Satellite without showing street names
- Hybrid shows a mix of standard and satellite.
12. Telemetry
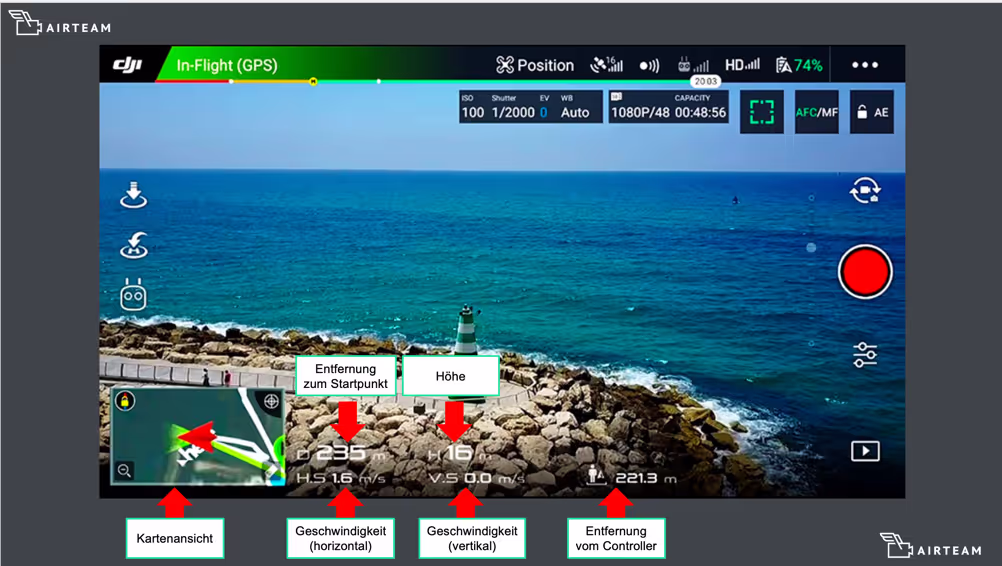
The display is shown in the lower left area of the screen and provides information about the flight.
- D = distance of drone to controller
- H = height depending on the starting location
- H.S. = horizontal speed display
- V.S. = display of vertical speed (rise, fall)
- VPS = distance to the ground, measured with sonar sensors and the small cameras under the drone. Very helpful info when there is no GPS connection.
- Map view = shows the direction of the drone in relation to the north.